These instructions are intended for new
installations.
If you are upgrading from AbleCommerce 7, please see Upgrading to AbleCommerce Gold instead.
A website or local development site
Asp.Net version 4.0, 4.5, or 4.6.2
Microsoft SQL database, versions 2005 and higher
* For detailed information on the system requirements for AbleCommerce,
please visit System Requirements.
Download a 30-day full featured trial version, or
Purchase AbleCommerce Gold software
Copy all program
files to the desired location in your website.
Note: If you are installing
AbleCommerce to a virtual folder, such as www.my-store.com/shopping/,
then make sure to configure a web directory in advance.
Either open the AbleCommerce.sln file with a development application like Visual Studio,
Or, you can upload the contents of the \website\ folder to a website running Asp.Net.
With a browser, open the default.aspx
page located in the /install/
folder.
Read and Accept the License Agreement to continue.

--- please read ---

Troubleshooting Assistance: In order to launch the web-based installation, your website needs to be configured to run Asp.Net applications.
Confirm you are running the minimum System Requirements.
If you use shared hosting services, then ask your system administrator or host if your website can run Asp.Net 4.0 or Asp.Net 4.5/4.6.2 applications.
Check to see if anything already discussed in our community forum is happening to you.
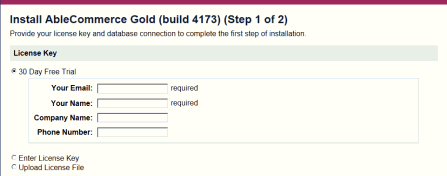
On the first page of the install wizard, you will see a section named License Key.

There are three choices here.
Use a 30-day demo Key - no license key is required, simply enter your email, name, company, and phone to register for a 30 day full installation. You can enter your license key later without re-installing.
Provide my license key - enter the public key you were sent as fulfillment of your order. Your license keys can be viewed by logging into your account and going to the Licenses tab.
Upload my license file - this option would only be used if you have the "commercebuilder.lic" file from a previous install. (This is not common)
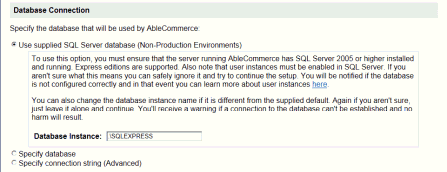
On the bottom of the first page of the install wizard, you will see a section
named Database Connection.

There are three choices here.
Specify database - Enter the server name or IP, database name, database user, password, if you have created a new (empty) MS-SQL database. This option can be also be used if you are upgrading a database.
Specify connection string - this option is for advanced users who wish to supply a connection string to their database.
Use the supplied SQL Express database - this option does not require that you create a database, but you must have additional software installed on the server.
The next step ensures you have acknowledged and reviewed the secure implementation
guide.

Be sure to download the link given to the PDF which describes the steps
that must be completed to make sure you are using AbleCommerce in a PCI
compliant manner.
Check the box if you acknowledge that you have reviewed the secure implementation guide.
Click the CONTINUE INSTALL > button to continue.
If you have entered the correct information, you will see a Initialization Complete confirmation.
Click to continue with the last step of the installation wizard.
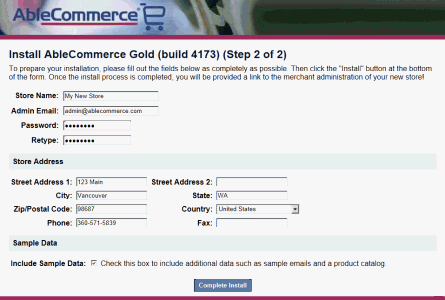
You should now see the final page of installation.

This is where you will enter the information necessary to create your store.
Enter the name of you Store. You can change this later.
Enter the email address of the primary store administrator.
Enter a password. Write this down!!!
Enter the primary address for your store.
Select the Country that you will be doing business with. We recommend that you select All Countries and remove any later.
The option to include Sample Data is recommended and includes 15 products that demonstrate many of the features of AbleCommerce.
When finished, click the button to Complete Install. If successful, you will see a confirmation page.
Click the button to Continue to Admin.
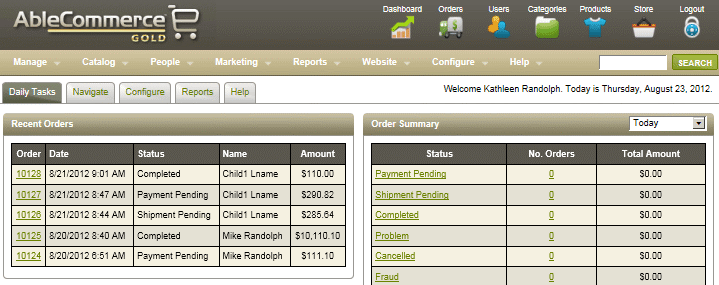
Login using your
username and password to access the AbleCommerce
Dashboard.

To get started, click on the Help
tab and complete the tasks as indicated.
For more information, see Getting Started in
the Merchant Guide.
Review Hot Patches for Gold and make sure to apply any hot fixes for the version you are installing.
Copyright © 1994 - 2025 AbleCommerce.com, All rights Reserved
eCommerce shopping cart software platform